|
4. Using the iTivity iManager
The iTivity iManager is the control center for iTivity. It provides the interface for administrators and support personnel to view and manage computers that are connected to an iServer.
To open the iTivity iManager, click on the shortcut icon you may have installed on your desktop during installation, or select Start > All Programs > iTivity > iManager > iTivity iManager. Notes on Customization · You can use the Windows Command Prompt or create Windows shortcuts to launch iManager with various special options. See Section 3.4, Customizing iManager Startup with Command Line Shortcuts. · Advanced users can customize the iTivity iManager to turn on or off the display of specific options. This chapter describes the standard, non-customized iManager interface. For information on customizing the interface, contact Tridia Support. · Individual iAgent systems can also be customized to disable certain types of remote access, such as Windows RDP, Telnet, or Chat. For information, see Section 2.3, Controlling iAgent Service Access Permissions in the iTivity Deployment Guide. 4.1 Main Menu Bar
The Main Menu bar is located at the top of the iTivity iManager window.
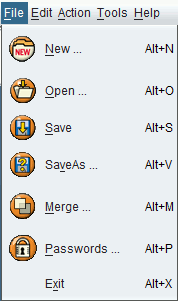
4.1.1 File Menu Options
The File menu allows you to create and manage lists of iServers that are displayed in the left pane of the Main Window. You only need these options if you are have multiple iServers and want to manage them in different lists. These lists can be saved to disk, merged, and have passwords applied to them. The lists are saved as files with a .ncn extension. 4.1.1.1 New
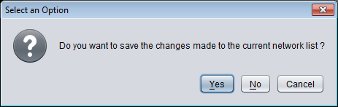
Use this option to clear the current list of iServers so you can create a new list. 1. Close any open iServer connections. 2. Choose File > New. 3. If you have made changes to the current scan file, you will be asked if you wish to save the current list.
If you wish to save your current list, click Yes. Otherwise click No. The list is cleared from the left pane. 4. You can now create a new list by adding iServers. See Section 4.1.2.1, Add iTivity iServer for instructions. 4.1.1.2 Open
To open a previously saved iServer list: 1. Select File > Open.
2. Select the correct location of the list file (the last saved file is automatically displayed), enter the file name, and click Open. The saved list is displayed in the left pane. 4.1.1.3 Save
Use this option to save the current iServer list. The list is saved under whatever filename you last opened. If no list file was opened, the list is saved as default.ncn. 4.1.1.4 Save As
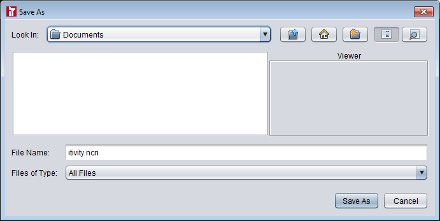
The Save As option allows you to save the active list with a new file name, whether it is a previously saved file that you retrieved or a list not already saved to a file. 1. Select File > Save As to open the Save As dialog box.
2. Select the directory to store the file and enter the file name. The current file name is listed by default. 3. Click Save As. 4.1.1.5 Merge
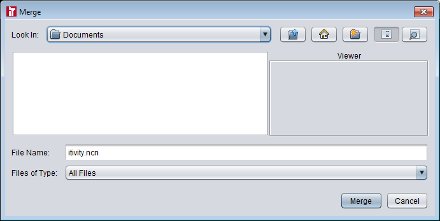
The Merge option allows you to combine the active list with a previously saved list. 1. Select File > Merge to display the Merge dialog box.
2. Select the saved list file (*.ncn file) that you want to merge with the current one. 3. Click Merge. The files are merged and the combined list is displayed in the left pane. 4.1.1.6 Passwords
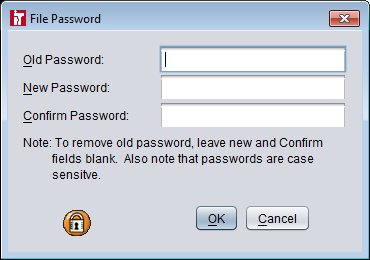
The Passwords option allows you to assign a password to the currently displayed list (*.ncn file). Once a password is assigned, the list is password-protected. Anyone attempting to display the list will have to enter the password. 1. Select File > Passwords to display the File Password dialog box.
2. To add a password, fill in the New Password and Confirm Password fields. To change an existing password, you also need to fill in the Old Password field. To remove an existing password, enter the old password and leave the other fields blank. This removes the password protection from the file. 3. Click OK button to save the change. 4.1.1.7 Exit
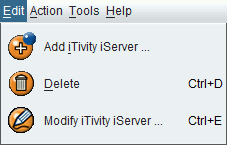
To close the iTivity iManager, select File > Exit. Other ways to exit the application include: s Using the hot key combination [Alt+X]. s Clicking on the iTivity icon located in the upper left-hand corner of the iTivity iManager screen and selecting Close. s Clicking on the X in the upper right-hand corner of the iTivity iManager screen. 4.1.2 Edit Menu
The Edit menu allows you to add, delete, or change iServer information. 4.1.2.1 Add iTivity iServer
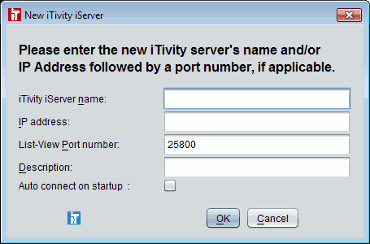
Use this option to add an iTivity iServer to your list. You must add iServers before you can view computers attached to those iServers. 1. Click the Edit Menu and choose Add iTivity iServer. The new iTivity iServer dialog is displayed.
2. Fill in the information.
3. Click OK. The iServer is added and displayed in the left pane on the Main Window. 4.1.2.2 Delete
Use this option to delete unnecessary iServers from your list. 1. Highlight the iServer you wish to delete. 2. Select Edit > Delete. 3. Click Yes to confirm the delete action. Other ways to access the Delete option include: s Selecting the Delete icon from the toolbar. s Right-clicking on the highlighted iServer or node and selecting Delete from the pop-up menu. s Using the hot key combination [Ctrl+D]. 4.1.2.3 Modify
Use this option if you need to change the definition of an iTivity iServer or secure dial site that has already been added to your list. 1. In the left pane, highlight the iServer or secure dial site. 2. Click the Edit Menu and choose Modify. The Modify iTivity iServer dialog or Modify Secure Dial Site dialog is displayed. 3. Change the information as needed. For iServers, see Section 4.1.2.1 for information. 4. Click OK. The definition is changed and the dialog closes. 4.1.3 Action Menu Options
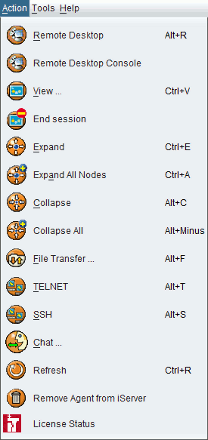
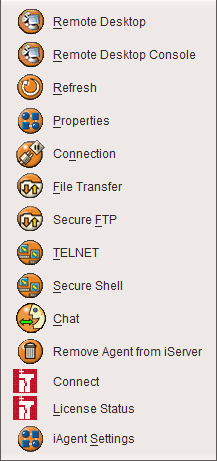
The Action menu allows you to initiate or terminate remote control sessions. It also allows you to initiate TELNET, Chat or File Transfer sessions and expand or collapse the list in the iTivity iManager left-hand pane. 4.1.3.1 Remote Desktop
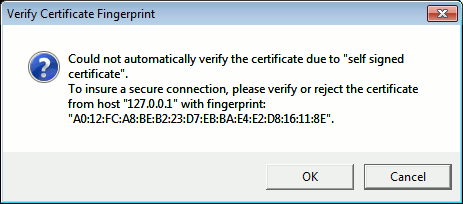
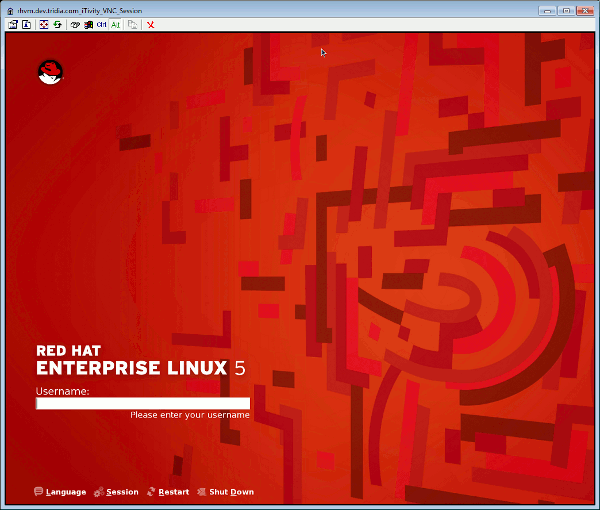
Note: You can initiate a standard remote viewing session without Terminal Services/RDP using the View option or the Connect option, as described later in this chapter. The Remote Desktop option allows you to initiate a remote viewing session through Windows Terminal Services or Remote Desktop Protocol (RDP). The remote Windows computer must be running Microsoft Terminal Services/RDP and must be connected to an iServer using either the Attended iAgent or Unattended iAgent. This option allows you to use Windows Terminal Services/RDP while taking advantage of the secure encryption offered by the iTivity iAgents. Note: This option is available on Windows XP, Vista and Windows 2003. For more information, contact Tridia Support. When to UseIf you are using iTivity 5.1.00 and later iManager and iAgents, you can create a new Windows session using Remote Desktop. · If you need to share a desktop with a logged on user, then View is the correct option. This is normally the case for providing technical support to a user. · If you need to have exclusive access to a desktop or create a new desktop, then either Remote Desktop or Remote Desktop Console (see Section 4.1.3.2) is the correct option. This is normally the case for remote administration of the iAgent system. Note: If you are viewing a Windows session created by another user via RDP connection, and if the other user minimizes their RDP viewer, then there are no screen updates to that session. This causes the screen to go black if you attempt to View that session. If you are already viewing that session, then the screen freezes. This is because the operating system does not notify the iAgent of the change, so there is no way to indicate that the session has gone inactive. Using remote desktop1. If necessary, expand the network list in the left-hand pane until the desired computer is visible. 2. Highlight the computer that you want to view. 3. Select Action > Remote Desktop or press the Ctrl+T hotkey combination. 4. If this is the first time your iTivity iManager is connecting to this computer, you may be asked to verify the requested encryption certificate fingerprint of the computer.
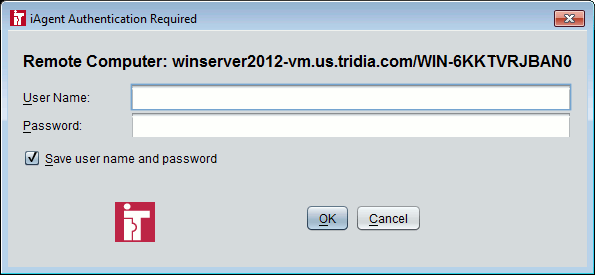
Note: This option depends on how the Attended iAgent or Unattended iAgent was installed. This can be controlled by editing the HTML file used to download and install the iAgents. See Section 5.4, Editing the iAgent HTML Files. If verifying the certificate number is required, the number can be obtained by right-clicking on the iTivity icon in the iAgent computer's system tray and selecting the Show Certificate Fingerprint option. Your computer retains the fingerprint in its cache for the next viewing session. 5. The iManager displays messages indicating that it is building the tunnel and then waiting for authentication. The Authentication dialog is displayed.
Note: The Authentication dialog depends on the authentication method used by the iAgent, which is determined when the iAgent is installed. For information on installing the iAgents, see Chapters 5 and Chapter 8 in this guide. 6. Enter your User Name and Password. Optionally, enter the Reason for connecting. Click OK. Note: Whether the Reason field is used depends on your organization. If used, the Reason entered is logged in the iServer Activity Log for auditing by administrators. See Section 2.12, iServer Activity Log for more information on the activity log. The RDP Windows Login dialog appears:
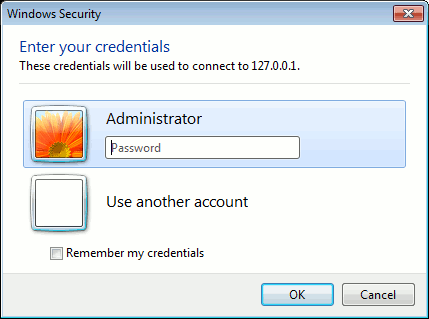
7. Enter the User Name and Password as required by Windows. The login is processed and the screen image for the remote computer appears. The Windows Local Host control bar appears in the viewer for you to control the remote session:
8. When you are ready to close the RDP session, click the X in the control bar. 4.1.3.2 Remote Desktop Console
The steps for using the Remote Desktop Console menu option are the same as for using the Remote Desktop option. See Section 4.1.3.1 for instructions. Note: This option is available on Windows XP, Vista and Windows 2003. For more information, contact Tridia Support. 4.1.3.3 View
The View option allows you to initiate a remote viewing session with an iAgent computer that is currently connected to an iServer. The procedure differs for viewing iAgents over the Internet and viewing via secure dial. Note: To initiate a viewing session with a Linux or UNIX computer running the Unattended iAgent, use the Connect option. See Section 4.1.3.14, Connect/Disconnect. Extended Remote Access in iTivity v 5.2: Beginning with v 5.2, the iTivity WebTunnel feature discovers and allows you to remotely access applications available on the iAgent computer through network connections. For more information, see Section 1.5.1, Configuring iTivity WebTunnel. Viewing an iagent over the internet1. If necessary, expand the network list in the left-hand pane until the desired computer is visible. 2. Highlight the computer that you want to view. 3. Select Action > View to start the connection process. 4. If this is the first time your iTivity iManager is connecting to this computer, you may be asked to verify the requested encryption certificate fingerprint of the computer.
Note: This option depends on how the Attended iAgent or Unattended iAgent was installed. This can be controlled by editing the HTML file used to download and install the iAgents. See Section 5.4, Editing the iAgent HTML Files. If verifying the certificate number is required, the number can be obtained by right-clicking on the iTivity icon in the iAgent computer's system tray and selecting the Show Certificate Fingerprint option. Your computer retains the fingerprint in its cache for the next viewing session. 5. The iManager displays messages indicating that it is building the tunnel and then waiting for authentication. The Authentication dialog is displayed.
Note: The Authentication dialog depends on the authentication method used by the iAgent, which is determined when the iAgent is installed. For information on installing the iAgents, see Chapter 5 and Chapter 8 in this guide. 6. Enter your User Name and Password. Optionally, enter the Reason for connecting. Click OK. Note: Whether the Reason field is used depends on your organization. If used, the Reason entered is logged in the iServer Central Audit Log for auditing by administrators. See Section 2.12, iServer Activity Log for more information on the activity log. The login is processed and the screen image for the iAgent computer appears in a separate window on your screen. Also, the color of the iAgent computer changes in the left pane to indicate it is now connected. 4.1.3.4 End Session
The End Session option closes all connections with an iAgent computer, including any View, Chat, TELNET, and FTP connections. Also, the tunnel is closed and the session does not remain cached. This means iTivity iManager must open a new tunnel and you will need to log in again to view the computer. 1. Highlight the computer you close the session with. 2. Select Action > End Session. 3. Click Yes at the prompt. 4.1.3.5 Expand
Use this option to expand the view of an iServer to display the currently connected iAgent computers, or to expand the view of a UNIX/Linux server to display the currently connected terminal sessions and services. 1. Highlight the node to expand in the left-hand pane of the Main Window. 2. Select Action > Expand. Other ways to access the Expand option include: s Selecting the Expand icon from the toolbar. s Right-clicking on the highlighted node and selecting Expand from the pop-up menu. s Using the hot key combination [Ctrl+E]. 4.1.3.6 Expand All Nodes
To fully expand all nodes: · Select Action > Expand All Nodes. 4.1.3.7 Collapse
Use this option if you want to collapse the view of a single iServer or UNIX/Linux server node. 1. Highlight the iServer you wish to collapse in the left-hand pane of the Main Window. 2. Select Action > Collapse. Other ways to access the Collapse option include: s Selecting the Collapse icon from the toolbar. s Right-clicking on the highlighted node and selecting Collapse from the pop-up menu. s Using the hot key combination [Alt+C]. 4.1.3.8 Collapse All
To fully collapse all nodes: · Select Action > Collapse All. 4.1.3.9 File Transfer
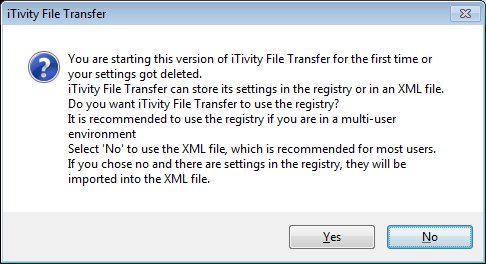
The File Transfer option lets you easily move, copy, or delete files on iAgent computers. 1. If necessary, expand the view in the left-hand pane of the Main Window to display the iAgent computer. 2. Highlight the computer that you want to transfer files to or from. 3. Select Action > File Transfer. 4. Depending on which authentication method was chosen during installation of the Attended iAgent or Unattended iAgent, iTivity displays a dialog to enter the log-in information. 5. Enter the log-in information as required. 6. If this is the first time you’ve selected the File Transfer option, a setup dialog is displayed.
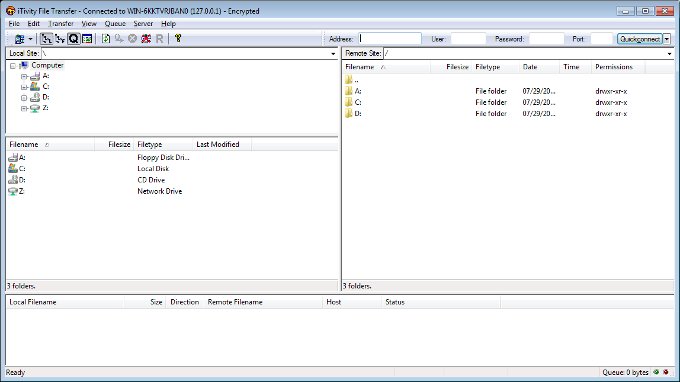
Click Yes to store your file transfer settings in the registry or No to store them in an XML file (recommended). 7. The File Transfer window is displayed.
The left-hand pane shows the folders and files on the local (viewer) computer. The right-hand pane shows the directories and files on the iAgent computer. See File Transfer Window below for more information about the features of this window. 8. To copy files, select the files or folders you want to copy in the left or right pane, and drag and drop them to the appropriate folder in the other pane. To delete a file or folder on either the iAgent or your local computer, right-click on the file and choose Delete from the popup menu. 9. To end the File Transfer session, choose File > Exit. File Transfer Window This window serves as an FTP client and offers many standard FTP features. For example, from the Transfer menu, you can choose the default transfer type as ASCII, Binary, or auto-detect, and you can choose settings for whether files of the same name will be automatically overwritten. This table explains the tool bar icons in the File Transfer window.
4.1.3.10 TELNET
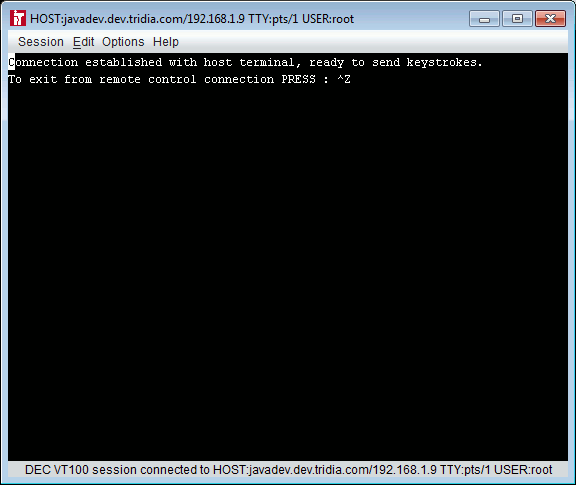
The TELNET option allows you to initiate a TELNET session with a Windows, UNIX or Linux system. TELNET is a standard terminal emulation program type for TCP/IP networks. It allows you to remotely enter commands as though they were entered on the server console. TELNET sessions with UNIX/Linux systems are encrypted and require a login. To open a TELNET session, do the following: 1. Highlight the computer with which you want to open the TELNET session. 2. Select Action > TELNET. The iTivity iManager opens a tunnel and displays the Authentication dialog:
3. Enter your user name and password and click OK. The TELNET window is displayed. You can now log in and issue commands.
TELNET Window Menu OptionsWithin the TELNET window, the following menu options are available:
4.1.3.11 SSH
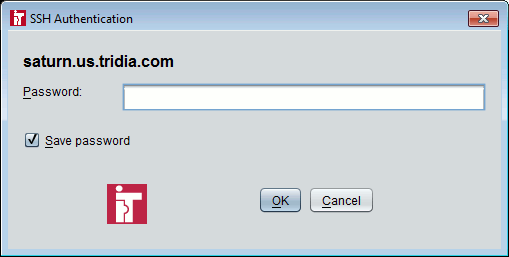
The SSH option allows you to initiate a secure shell or SSH session with a Windows, UNIX or Linux system. The SSH session opens in a standard terminal emulation program type for TCP/IP networks. It allows you to remotely enter commands as though they were entered on the server console. SSH sessions with UNIX/Linux systems are encrypted and require a login. To open an SSH session, do the following: 1. Highlight the computer with which you want to open the SSH session. 2. Select Action > SSH. The iTivity iManager opens a tunnel and displays the Authentication dialog:
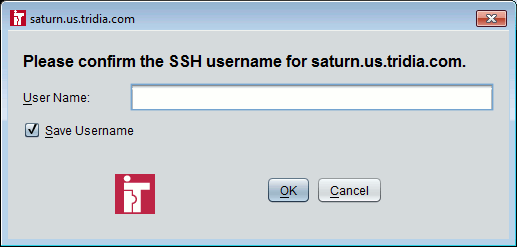
3. Enter your user name and password for the iAgent and click OK. The SSH user name dialog is displayed. Enter the user name for the SSH session. This may be a different user name than you used in the previous dialog for the iAgent access permission, if any.
4. Enter your SSH user name and click OK. The SSH password dialog is displayed. Enter the password for the SSH user name from the previous dialog.
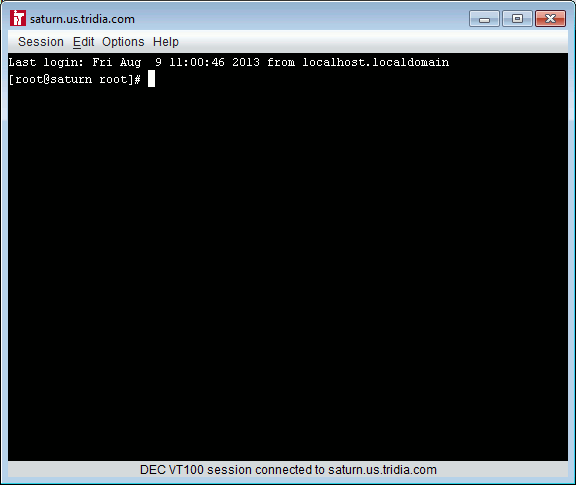
5. Enter your SSH password and click OK. The SSH window is displayed. You are already logged in and ready to issue commands.
SSH Window Menu OptionsWithin the SSH window, the following menu options are available:
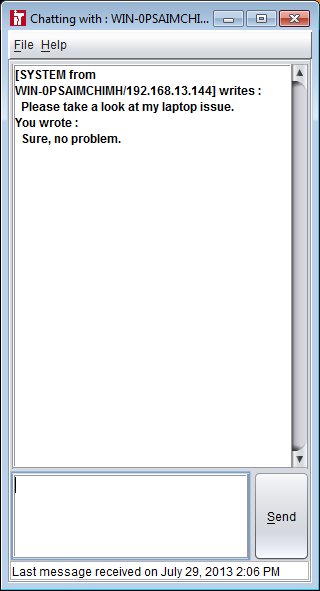
4.1.3.12 Chat
The Chat option allows you to open a chat session with a user on an iAgent computer. Note: Whether Chat is supported depends on installation settings. For more information, see Section 5.2. 1. In the left-pane, highlight the computer that you want to open a Chat session with. 2. Select Action > Chat or right-click on the computer and choose Chat from the popup menu. If there is not a current connection to the computer, iTivity displays a message indicating that it is creating the connection. If the computer requires authentication, a dialog is displayed for you to enter your login information. Enter the required information and click OK. 3. The Chat window is opened on both the iAgent computer and your desktop.
4. Type your messages at the prompt. Click the Send button to send. Text of your messages and responses appears in the main text area of the window. 5. To end the session, choose File > Exit in the Chat window. Click Yes to confirm. 4.1.3.13 Refresh
The Refresh option rescans the iServers in the list to show the current connections. 1. In the left pane, highlight the iServer you want to refresh. 2. Choose Action > Refresh or press the Ctrl+R hot-key combination. 4.1.3.14 Connect/Disconnect
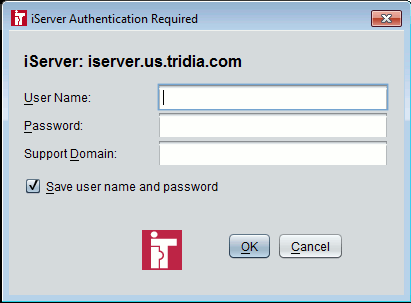
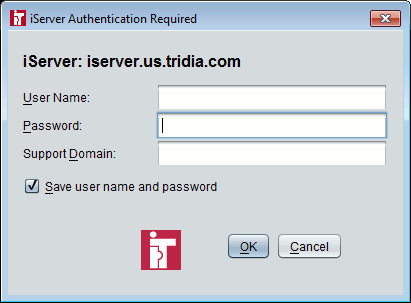
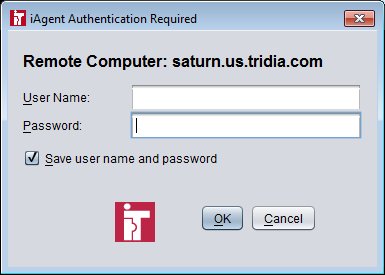
The Connect option is used to open a connection to an iServer. If the currently selected iServer is already connected, then this option is changed to Disconnect. This option is also used to connect to and then view a UNIX/Linux iAgent computer. See Connecting to the Unattended iAgent on UNIX/Linux, in this section. To Connect to an iServer1. In the left pane, highlight the iServer you want to connect to. 2. Click the Connect toolbar button, or click the Action Menu and choose Connect. You can also double-click on the iServer in the left pane. The iManager displays messages indicating that it is building the tunnel and then waiting for authentication. The Authentication dialog is displayed.
3. Enter your User Name, Password, and Support Domain (if applicable) and click OK. Note: If your network uses Active Directory domains, you must enter the domain along with the user name, for example "MYDOMAIN\user name". Contact your network administrator if you need assistance. The connection is established. The connected iServer changes in the left pane to a light green color. To DisConnect an iServer1. In the left pane, highlight the iServer you want to disconnect from. 2. Click the Disconnect toolbar button, or choose Action > Disconnect. 3. Click Yes at the prompt. Connecting to the Unattended iAgent on UNIX/LinuxThe Connect option is also used to connect to Linux or UNIX servers running the Unattended iAgent and to their terminal sessions or services. Extended Remote Access in iTivity v 5.2: Beginning with v 5.2, the iTivity WebTunnel feature discovers and allows you to remotely access applications available on the iAgent computer through network connections. For more information, see Section 1.5.1, Configuring iTivity WebTunnel. To remotely view the UNIX/Linux computer, do the following: 1. Highlight the UNIX/Linux computer and click the Connect toolbar button or choose the Action > Connect option. You can also double-click on the computer in the left pane. The iManager displays messages indicating that it is building the tunnel and then waiting for authentication. The Authentication dialog is displayed.
2. Enter your user name and password for the UNIX/Linux computer and click OK. The connection is established and the current terminal sessions and services are displayed below the UNIX/Linux node.
3. To view one of the terminal sessions or services, highlight it in the list and click the View toolbar button or choose the Action > Connect option again. You can also double-click on one of the services or sessions to connect. A viewer window opens, displaying the service or terminal session.
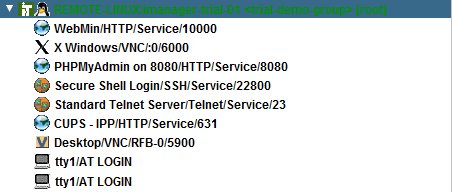
Note: For TELNET sessions, a secure login dialog is displayed. To end the remote control session, click the End View toolbar button, or choose Action > Disconnect. Connecting to an X Windows Session on a UNIX/Linux Unattended iAgentBeginning with iTivity v 5.2, you can also use the Connect option to view X Windows desktops on Linux and UNIX iAgents. This feature provides secure remote access to Linux and UNIX graphical consoles. To remotely view an X Windows session, do the following: 1. Highlight the UNIX/Linux computer and click the Connect toolbar button or choose the Action > Connect option. You can also double-click on the computer in the left pane. The iManager displays messages indicating that it is building the tunnel and then waiting for authentication. The Authentication dialog is displayed.
2. Enter your user name and password for the UNIX/Linux computer and click OK. The connection is established and the current terminal sessions and services are displayed below the UNIX/Linux node.
3. Highlight the X Windows session and click the View toolbar button, or choose the Action > Connect option again. You can also double-click on the highlighted session to connect.
A viewer window opens, displaying the X Windows desktop session.
To close an X Windows session, click the lock icon in the upper left hand corner of the Viewer and select Close. 4.1.3.15 Remove iAgent from iServer
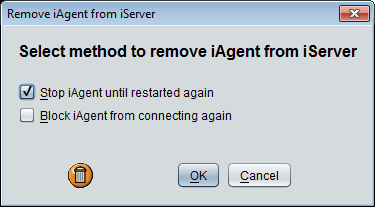
Use this option to close the connection between a listed computer or server and the iServer. You can also prevent this computer from reconnecting at a later time. This option is available only when a connected iAgent computer is highlighted in the left pane. Caution: Once an iAgent is removed from the iServer, remote viewing and control is disabled. The connection can only be re-established by restarting the iAgent at the remote computer or server. 1. In the left pane, beneath a connected iServer, highlight the computer or server you want to disconnect. 2. Choose Action > Remove iAgent from iServer. The Remove iAgent dialog is displayed.
3. Choose an option:
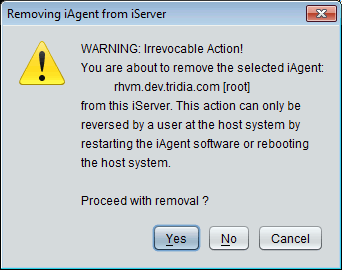
4. Click OK. iTivity issues a Warning requiring you to confirm the action.
5. Click Yes to proceed or Cancel to cancel. 4.1.3.16 License Status
Use this option to display the License status for the currently selected iServer. First highlight the iServer in the left pane, then choose this option to display the License Status dialog:
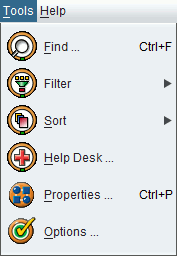
Note: If you've updated your license, you can click the Refresh button to update the dialog. The dialog is automatically refreshed every 30 seconds it is displayed. 4.1.4 Tools Menu Options
Selecting the Tools menu gives you access to various iTivity tools, including powerful remote control options designed for support personnel. 4.1.4.1 Find...
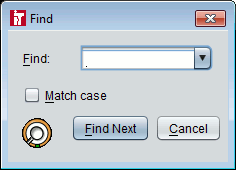
The Find option can be used to search an extensive network list for a specific text string, making it easy to find a particular iServer or iAgent system node. 1. Choose Tools > Find. The Find dialog is displayed.
2. Type the string you want to search for. 3. Click the Find Next button. The network list is searched and if the text is found, the node is highlighted. 4. Click the Find Next button to search again or the Cancel button to close. 4.1.4.2 Filter...
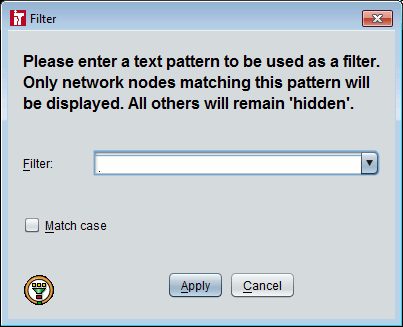
The Filter option is another tool for managing the view of extensive network lists. You can choose to filter the list to show only nodes that contain a specific text string. You can also clear a filter to display your entire list. Filter > NewTo filter the network list, do the following: 1. Choose Tools > Filter > New. The Filter dialog is displayed.
2. Type the text string that you want to use as your filter. If desired, click the Match case box. 3. Click the Apply button. The network list is displayed with only the nodes that contain the filter text string you entered. Filter > ClearUse the Clear option to remove a filter and redisplay the entire network list. Choose Tools > Filter > Clear. The entire network list is displayed. 4.1.4.3 Sort
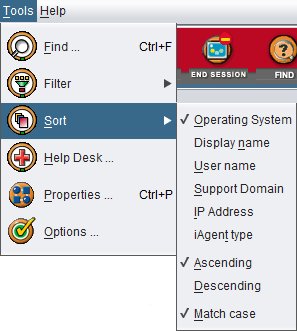
The Sort option is another tool for managing the view of extensive network lists. You can sort by any of the options listed on the flyout menus and you can choose Ascending or Descending order. You can also turn a Match Case option on or off. 1. Choose Tools > Sort. The Sort flyout menu is displayed.
2. Click the attribute you want to use for sorting: Operating System, Machine name, etc. Or click Ascending or Descending as desired. Or choose to turn on or off the Match Case toggle option. The menu closes and the network list is resorted according to your selection. 4.1.4.4 Help Desk
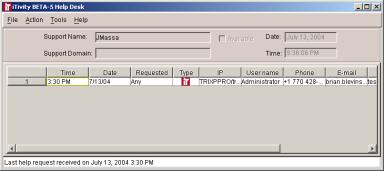
The Help Desk option opens the Help Desk window within iTivity iManager. You use this window to announce your availability to provide remote support, and to respond to help requests.
When multiple help requests are listed, they are sorted by time and date, with the oldest outstanding requests at the top. You can click the buttons at the top to sort by any column.
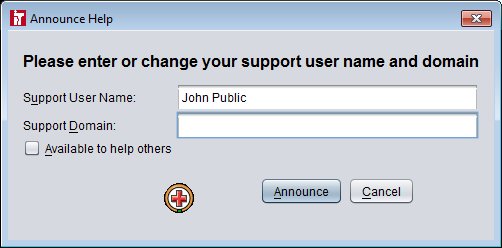
How the Help Desk WorksThrough the Help Desk, iTivity supports multiple help desk administrators who can receive and respond to requests from users over the Internet. The process works as follows: 1. A user running the Attended iAgent issues a Help Request. See Section 6.1, Requesting Support, for information. 2. The request is displayed in the Help Desk window of all copies of iTivity iManager connected to the same iServer as the Attended iAgent. Note: While all users of iTivity iManager can see all pending help requests, you must announce your availability each time you start the iTivity iManager in order to be listed as available on the Help Request dialog and have requests sent specifically to you. See Help Desk Window > Tools Menu, later in this section. 3. The request continues to be displayed in the Help Desk window until a support person opens a remote session with the requester's computer. This session can be any of the following: View, Quick View, File Transfer, Quick File Transfer, TELNET, Quick TELNET, or Chat. Help Desk Window > File MenuChoose this option to print the currently displayed list of open help requests. The option displays a Page Setup dialog, allowing you to specify information for the print job. ExitChoose this option to close the Help Desk window. Help Desk Window > Action MenuThe Action menu options allow you to connect to and display information about an iAgent computer that sent a help request. These options are similar to options on the Action menu and Tools menu in the iTivity Main window. Click a help request in the list to select it, then choose any of these options. ViewChoose this option to open a remote control session with the selected iAgent. You can also issue this command by double-clicking on a request in the Help Desk window. End ViewChoose this option to close the remote control session with the selected computer. File TransferThis option opens a File Transfer session with the selected computer, to allow you to copy, move, or delete files. TELNETChoose this option to open a TELNET session with a selected UNIX server. ChatChoose this option to open a Chat session with the selected computer. PropertiesThis option displays a Properties dialog box for the selected computer. This information is for review only. ConnectionThis option opens a dialog displaying the connection information for the selected computer. See the Connections subheading in Section 4.1.4.6, Options. SecurityChoose this option to open a Security dialog, which allows you to determine whether the iTivity iManager opens an encrypted or unencrypted connection to the selected iAgent. Help Desk Window > Tools MenuThe Tools menu allows you to announce your availability to receive help requests. While all iTivity iManager users can see pending help requests in the Help Desk window, you must announce your availability each time you start iTivity iManager in order to be listed as available on the Help Request dialog and have requests sent specifically to you. 1. Choose Tools > Announce. The Announce Help dialog is displayed.
2. Fill in the information. · Support User name - Your user name. · Support domain - The department or group within the organization to which you can provide support. If left blank, help requests from all departments will be delivered to your system. · Available to help others - Indicates whether or not you are currently available to respond to help requests. 3. Click Announce. Help Desk Window > Help MenuTopicsChoose this option to open the iTivity Help. AboutChoose this option to open the About Box containing iTivity version information. 4.1.4.5 Properties
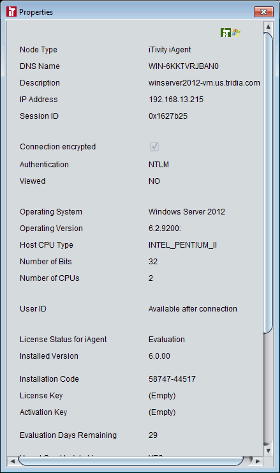
Selecting the Properties option opens a Properties dialog for the currently-highlighted iServer or computer.
This information is for review only. Modifications cannot be made through the Properties dialog. Note: The session ID shown is a unique serial number for each connected iAgent computer. 4.1.4.6 Options
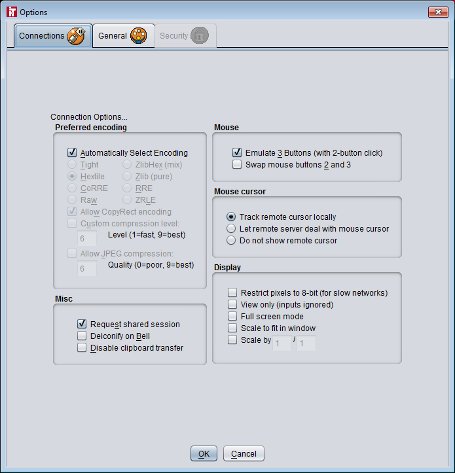
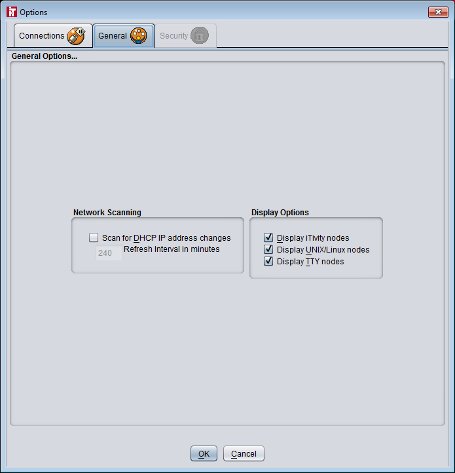
The Options option opens a three-tabbed dialog allowing you to select connection options, adjust general options (such as the refresh interval) and to modify security options. Note: The Options settings apply to the local computer when it runs as an iAgent. That is, when it has the Attended iAgent or Unattended iAgent installed and is being viewed by an iTivity iManager installed on another computer. If neither iAgent is installed, these settings have no effect. ConnectionsSelecting Tools > Options > Connections opens the Connections dialog, allowing you to make global changes to the iTivity iManager. These become the default connection settings used by the local machine. Preferred encoding Automatically Select Encoding – iTivity automatically selects the encoding and compression method based on the connection speed. If you clear the Automatically Select Encoding checkbox, you can manually choose from the following options: · Tight – Designed for use over slow modem connections; uses more sophisticated sampling and analysis to determine the most efficient representation. Recommended on very slow connections, less than 64 Kbps. · ZlibHex (mix) – Attempts to achieve the low CPU use of hextile with better compression of zlib by strategically using zlib compression in the hextile framework. · Hextile – This is the default and the preferred method in most situations. · Zlib (pure) – Uses standard zlib compression routines for each update. Recommended over moderate connections, 64 to 256 Kbps. · CoRRE – Compressed Rise-and-Run length Encoding; uses one byte for the width and height of each colored rectangle. · Raw – Should only be used with high-speed, uncongested networks. · RRE – Rise-and-Run length Encoding; represents all updates as a set of colored rectangles. · Allow CopyRect encoding – Allows for faster updates during window drags but may cause screen distortion with some connections. Try it with your current session. If you experience problems, turn it off by unselecting the box. · Custom compression level: Level (1=fast, 9=best) – Selects a trade-off between more compression and higher CPU use in zlib, zlibhex, and eventually tight encodings. Use lower numbers for faster networks and less-available CPU time. Use higher numbers for slower networks and more available CPU time. · Allow JPEG compression: Quality (0=poor, 9=best) – Allows the user to select the preferred JPEG compression level for the viewing session. Misc. · Request shared session – This option asks the iAgent to leave any existing connections open, allowing you to share the desktop with someone already using it. This is the default setting. If you try to initiate a non-shared session while other connections are in place, the iAgent will reject the request instead of dropping the existing connections. If you request a non-shared session when no other connections are active, your request is processed and subsequent requests for a session are rejected by the iAgent. · Deiconify on Bell – If the iAgent is running on a machine using a “bell” message (a beep notifying the user that email has arrived, for example), the iAgent will transmit this bell message, causing a beep at the viewer if it has sound facilities. If the viewer is minimized during the process, receiving the bell message will cause the viewer to un-minimize. · Disable clipboard transfer – Clipboard changes caused by cutting or copying at either the viewer or server end are normally transmitted to the other end. This option disables clipboard transfers. Mouse · Emulate 3 Buttons – Allows users with a two-button mouse to emulate a middle button by pressing both buttons at once. This option is enabled by default. · Swap mouse buttons 2 and 3 – PC mouse buttons are normally mapped as 1,2,3. Selecting this option causes them to be mapped as 1,3,2. This may be more useful for two-button users who only have left-right, since they will then get buttons 1 and 2 instead of 1 and 3. Mouse cursor · Track remote cursor locally – This option gives you faster cursor updates. · Let remote server deal with mouse cursor – The viewed machine redraws its cursor every time. · Do not show remote cursor – This option displays only the viewer cursor. Display · Restrict pixels to 8-bit –The viewer will normally accept whatever pixel format the iAgent offers and do the translation locally. Selecting this option forces it to request 8-bit true-color (BGR233) from the iAgent. This helps reduce network traffic and is useful over modems. · View only – In this mode, no mouse or keyboard events are sent back to the iAgent. This is useful for training sessions where you want to observe but not interfere. · Full-screen mode – Selecting this option causes connections to start in full-screen mode by default. · Scale by n/m – This specifies a scaling factor for the local display. The values should be integers. This feature is used to resize the viewer window so that it is easier to work with. For example, entering a value of 1/2 will cause the viewer window to resize to one-half of its original height/width, while a value of 2/1 causes the viewer to double the size of the viewer window. GeneralScan and display settings for the local machine can be changed through the General tab (Tools > Options > General).
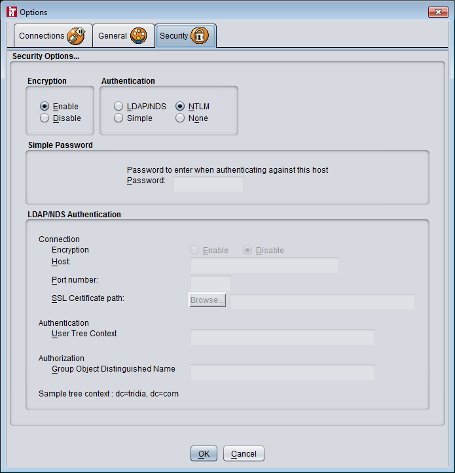
Network ScanningScan for DHCP IP address changes You can specify how often iTivity scans for address changes on networks where DHCP is enabled. Increasing the Refresh interval is another way to speed up the scanning. Display OptionsYou can use these options to limit the types of connected computers to display: · iTivity Windows nodes · UNIX/Linux nodes · TTY nodes SecurityThis tab is available only when: · You have an iAgent installed on the computer along with the iManager · You chose NTLM as the authentication method when installing the iAgent. Note: The encryption and authentication settings on this tab apply to the installed iAgent, not to the iServer. After changing settings on the Security tab and clicking OK to exit, you must stop and then restart the iAgent for the changes to take effect.
Encryption This option enables/disables the encryption capability of the local computer when it acts as an iAgent. Authentication Allows you to change the authentication method of the local machine after iTivity is installed. · LDAP/NDS - The user connects to this iAgent using either the Lightweight Directory Access Protocol (LDAP) or Novell Directory Services (NDS). If you choose this option, you need to enter the authentication information below. · NTLM - The user is asked to supply the iAgent’s User Name and Password (the same login id and password the iAgent uses to log on to the Windows network). · VNC - The user is asked to supply a simple password only. · None - The user is not asked to provide any password. VNC Password Allows you to change the Simple password of the local computer after iTivity is installed. This option is only available if Simple is selected as the authentication method. LDAP/NDS Authentication This area of the dialog becomes available when you choose LDAP/NDS as the Authentication option above. · Encryption – Determines whether LDAP authentication connections will be encrypted. · Host – The host name or IP address of the LDAP/NDS server. · Port Number – Optional port number for connecting to a server on a non-standard port. Leave this blank if you are unsure, and the standard port number will be used. · SSL Certificate path – Only needed when encryption is enabled. Specifies the location of the DER encoded certificates containing the trusted public key(s) of the LDAP server in use. · Authentication User Tree Context – The location of the user objects in the LDAP tree. To authenticate with the LDAP server, a user’s object must be within the server tree branch given here. Specifying the exact location can greatly speed up lookups on heavily loaded servers. Values in this field might look something like the following: ou=AcmeUsers,ou=user,o=acme??sub · Authentication Group Object Distinguished Name – The name of the particular authorization group on the LDAP server that grants a user permission to use iTivity to access the iAgent system. To access the iAgent system across the network, the user must be a member of this group or a nested group. 4.1.5 Help Menu Options
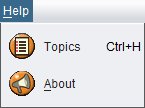
4.1.5.1 Topics
Selecting Help > Topics opens the iTivity iManager online help, delivered in a standard help format, complete with a table of contents, index, and full-text search functionality. 4.1.5.2 About
Selecting Help > About displays version and license information about your iTivity installation. 4.2 Toolbar
The toolbar consists of shortcuts to many of the available menu options.
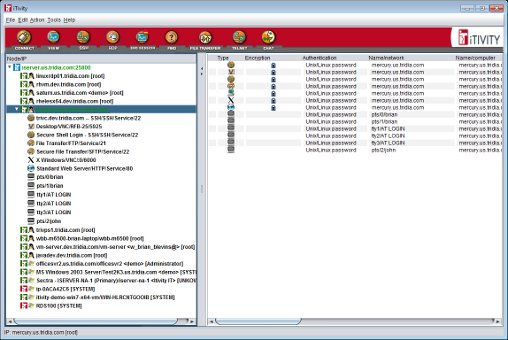
4.3 Main Window Areas
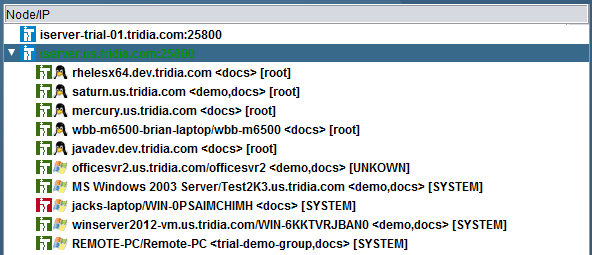
The Main Window of the iTivity iManager is similar to the familiar dual-pane of Windows Explorer. The left side contains an expandable list of the iServers and their connected computers visible to the iTivity iManager. The right pane shows detailed information about the item currently selected in the left pane. 4.3.1 Left-Hand PaneThe left pane shows the iServers that have been added. When iTivity iManager is connected to an iServer, the connected iAgent computers are also shown.
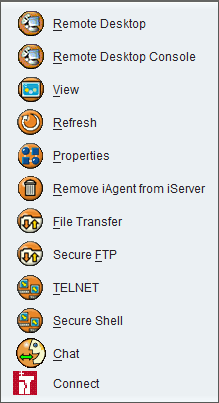
To open a pop-up menu of available options, right-click on the desired iServer or connected computer.
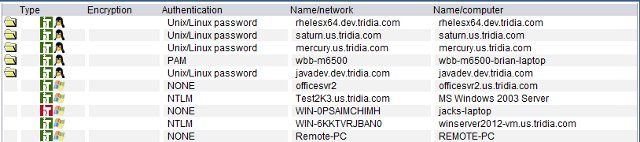
A few of the menu options are different depending on whether the highlighted item is an iServer or a connected iAgent. The menu options are the same as those available from the Main Menu bar. See Section 4.1 for information. 4.3.2 Right-Hand PaneThe right pane lists the computers connected to the iServer that was last highlighted in the left pane. It provides a quick way to see the computers' properties.
To open a short-cut menu to available options, right-click on the desired computer.
Most of the menu options are the same as those available from the Action Menu Options. See Section 4.1.3 for information. The Properties dialog is discussed in Section 4.1.4.5. 4.4 iAgent System Tray Menu
When you open a remote control session with a Windows computer through iTivity iManager, the session appears in the Windows task bar, with a lock icon and the iAgent computer's name.
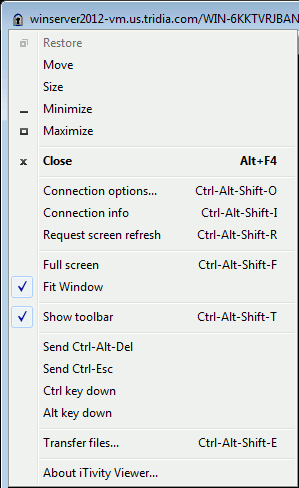
The iAgent System Tray menu provides options for controlling the remote control session. To access this menu, right-click on the task bar. Or, while viewing the iAgent, click on the lock icon in the top left-hand corner of the window.
RestoreRestores the iAgent desktop to its previous size and location. MoveAllows you to move the iAgent desktop on your screen. SizeAllows you to alter the size of the iAgent desktop on your screen. MinimizeReduces the iAgent desktop to an icon in the taskbar. MaximizeEnlarges the iAgent desktop to fill the screen. CloseCloses the viewer and ends the remote control session. The iAgent computer continues running. Connection options…Displays the TridiaVNC Viewer Options dialog. TridiaVNC Viewer is the module that actually handles remote view and control of the iAgents. Connection Tab
Format and Encodings Use encoding: You can manually select from the following options: · ZLRE - (Default) Designed for machines with low bandwidth but ample CPU capacity. · Hextile - Hextile encoding is usually the best choice for use in high-speed network environments (for example, Ethernet local-area networks). · Tight – Designed for use over slow modem connections; uses more sophisticated sampling and analysis to determine the most efficient representation. Recommended on very slow connections, less than 64 Kbps. · RRE – Rise-and-Run length Encoding; represents all updates as a set of colored rectangles. · CoRRE – Compressed Rise-and-Run length Encoding; uses one byte for the width and height of each colored rectangle. · Zlib (pure) – Uses standard zlib compression routines for each update. Recommended over moderate connections, 64 to 256 Kbps. · ZlibHex (mix) – Attempts to achieve the low CPU use of hextile with better compression of zlib by strategically using zlib compression in the hextile framework. Use 8-bit Color The viewer will normally accept whatever pixel format the iAgent offers and do the translation locally. Selecting this option forces it to request 8-bit true-color (BGR233) from the iAgent. This helps reduce network traffic. Custom compression level You can check this option and use the slider to select a custom compression level with values from 1 to 9. Use lower numbers for faster networks and less-available CPU time. Use higher numbers for slower networks and more available CPU time. Allow JPEG compression: Quality (0=poor, 9=best) Allows the user to select the preferred JPEG compression level for the viewing session. This option is available only when Tight is chosen as the Use Encoding option. Allow CopyRect encoding When this option is checked, it allows for faster updates during window drags but may cause screen distortion with some connections. Try it with your current session. If you experience problems, turn it off by clearing the check box. Restrictions View only In this mode, no mouse or keyboard events are sent back to the iAgent. This is useful for training sessions when you want to observe but not interfere. Disable Clipboard Transfer Clipboard changes caused by cutting or copying at either the iAgent or iManager end are normally transmitted to the other end. This option disables clipboard transfers. Display Scale by Specifies a scaling factor for the local display. This feature is used to resize the viewer window so that it is easier to work with. For example, selecting a value of 75% will cause the viewer window to that is 3/4 of the original height and width. Full-screen mode Selecting this option causes connections to start in full-screen mode by default. Deiconify on remote Bell event If the iAgent is running on a machine using a “bell” message (a beep notifying the user that email has arrived, for example), the iAgent will transmit this bell message, causing a beep at the viewer if it has sound facilities. If the viewer is minimized during the process, receiving the bell message will cause the viewer to un-minimize. Mouse Emulate 3 Buttons (with 2-button click) Allows users with a two-button mouse to emulate a middle button by pressing both buttons at once. This option is enabled by default. Swap mouse buttons 2 and 3 PC mouse buttons are normally mapped as 1,2,3. Selecting this option causes them to be mapped as 1,3, 2. This may be more useful for two-button users who only have left-right, since they will then get buttons 1 and 2 instead of 1 and 3. Mouse cursor · Track remote cursor locally - This option gives you faster cursor updates. · Let remote server deal with mouse cursor - The viewed machine redraws its cursor every time. · Don't show remote cursor – This option displays only the viewer cursor. Request Shared Session This option asks the iAgent to leave any existing connections open, allowing you to share the desktop with someone already using it. This is the default setting. If you try to initiate a non-shared session while other connections are in place, the iAgent will reject the request instead of dropping the existing connections. If you request a non-shared session when no other connections are active, your request is processed and subsequent requests for a session are rejected by the iAgent. Globals Tab
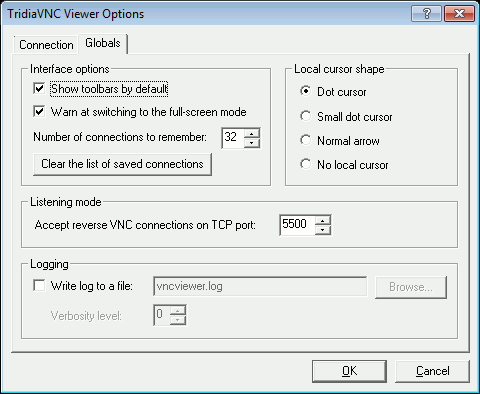
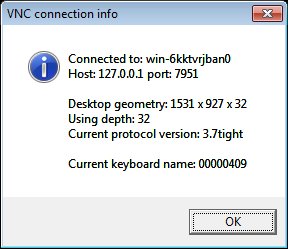
Interface Options · Show toolbars by default: Displays the TridiaVNC Viewer toolbar at the top of the view window. Enabled by default. · Warn at switching to the full-screen mode: When full-screen mode is selected, confirm full-screen mode selection and inform the user how to exit full-screen mode. Enabled by default. · Number of connections to remember: Not applicable to iTivity. · Clear the list of saved connections: Click the button to clear the list of saved connections. Local cursor shape This setting determines how the mouse cursor for the local (iManager) machine is represented. The default is a dot cursor. Listening mode The TCP port number to listen for incoming VNC server connection requests. Not used with iTivity. Logging Disabled by default. Check this option to have the TridiaVNC Viewer write a log file of its activity. When checked, you can select a name and location for the log file, and also choose the level of detail (Verbosity level) between 1 and 12. Connection infoSelecting this option opens the VNC connection info box that provides iAgent and connection information.
Request screen refreshAllows you to conveniently refresh the iAgent screen. Full screenAllows you to switch the viewer to full-screen mode. See Section 4.4.1, Full Screen Mode, for more information. Fit WindowAllows you to resize the display of the iAgent screen to fit inside a window on your desktop. The iAgent desktop image is automatically scaled to fit into the viewer window on your system. Send Ctl-Alt-DelBecause the keystrokes [Ctl]+[Alt]+[Del] may be interpreted by the local machine, this option is provided for sending [Ctl]+[Alt]+[Del] to the iAgent computer. Send Ctl-ALT-EscBecause the keystrokes [Ctl]+[Alt]+[Esc] may be interpreted by the local machine, this option is provided for sending [Ctl]+[Alt]+[Esc] to the iAgent computer. Ctrl kEY DownThe keystrokes [Ctl]+[¯] may be interpreted by the local machine. Use this option to send [Ctl]+[¯] to the iAgent machine. Alt kEY DownThe keystrokes [Alt]+[¯] may be interpreted by the local machine. Use this option to send [Alt]+[¯] to the iAgent machine. tRANSFER fILES
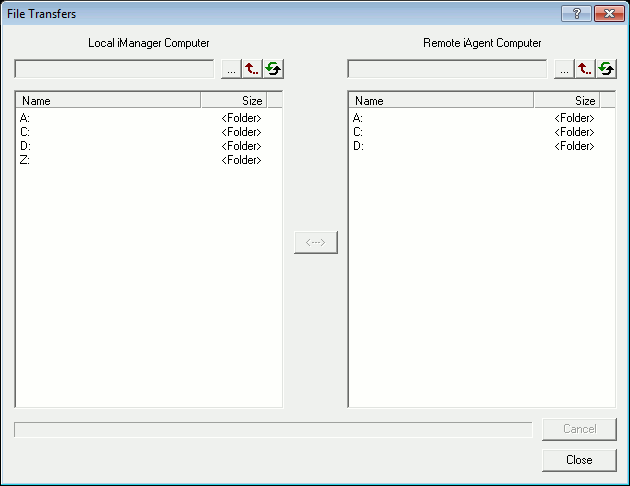
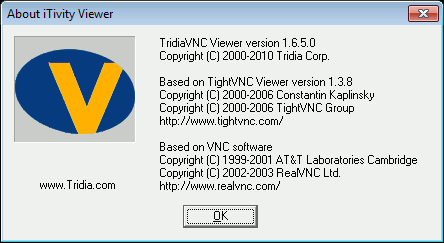
This option opens a File Transfers window that allows you to copy files between the (local) iManager computer and the (remote) iAgent computer. Initially, the drive letters for each machine are listed. Double-click on a drive letter, or use the buttons at the top of the list to navigate to the files you want to copy. About iTivity viewer...The About box displays version information for the iTivity Viewer software.
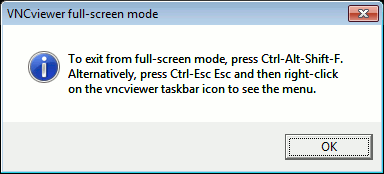
4.4.1 Full-Screen ModeThe viewer can be switched into a full-screen mode. This is particularly useful when connecting to an iAgent screen that is the same size as your local one. If the iAgent screen is bigger, you won’t get any scrollbars, but you can scroll by bumping the mouse against the edge of the screen. To exit full-screen mode, you can enter [Ctrl]+[Alt]+[Shift]+[F]. Or you can type [Ctrl]+[Esc]+[Esc], then right-click on the iAgent task to open the iAgent System menu and uncheck the Full screen option. When you select full-screen mode, a dialog appears with instructions:
Copyright © 2017 - 2023, iTivity Corporation |